How to Use a Drill: A Complete Guide to Drilling, Driving Screws, and Choosing the Right Bit
How to Use a Drill: A Complete Guide to Drilling, Driving Screws, and Choosing the Right Bit

A drill is one of the most useful tools you can have in a workshop, garage, job site, or toolbox.
Need to hang a shelf? Drill a pilot hole. Building a piece of furniture? You will probably need a drill. Working with sheet metal or steel? The right drill and bit combination can make the job much easier. Driving dozens of screws? A cordless drill can save considerable time and effort.
But getting good results isn't simply about pulling the trigger.
The right drill bit, speed, pressure, technique, and setup all matter. Using the wrong combination can lead to wandering holes, broken bits, excessive heat, damaged fasteners, or even injury.
This guide explains how to use a drill properly, from understanding the controls to choosing drill bits and drilling wood, metal, masonry, and other materials.
What Can You Do With a Drill?
A drill can perform several different jobs depending on the tool, bit, and accessory being used.
Common applications include:
- Drilling holes in wood
- Drilling holes in metal
- Drilling into plastic
- Drilling into masonry and concrete with the appropriate tool and bit
- Creating pilot holes
- Driving and removing screws
- Countersinking fasteners
- Enlarging existing holes
- Creating large-diameter holes
- Installing hardware and fixtures
- Using compatible wire wheels, brushes, sanding drums, and other accessories
For heavier-duty applications, you may need a hammer drill, rotary hammer, drill press, magnetic drill, or another specialized drilling machine rather than a standard handheld drill.
The first step is therefore deciding what you are actually trying to accomplish.
Drill vs. Hammer Drill vs. Impact Driver
These tools can look similar, but they are not interchangeable.
Standard Drill/Driver
A standard drill/driver is the most versatile option for general drilling and screw-driving.
It is commonly used for:
- Wood
- Plastic
- Light-to-moderate metal drilling
- Pilot holes
- Screw installation
Hammer Drill
A hammer drill combines rotary motion with a hammering action. It is designed primarily for drilling into materials such as brick, block, masonry, and concrete.
The hammer function should not be used simply because it is available. For materials such as wood and metal, use the appropriate rotary-only setting.
Impact Driver
An impact driver is primarily designed for driving fasteners. Its impact mechanism produces high rotational force, making it particularly useful for longer screws, lag screws, and other fastening applications.
An impact driver is not automatically a replacement for a conventional drill. Use accessories specifically rated for impact applications when required.
Drill Press
A drill press provides considerably more control when accuracy, repeatability, or perpendicular holes are important.
Unlike a handheld drill, the machine guides the spindle and bit, allowing you to control drilling depth and maintain consistent alignment.
For workshop and machining applications, a drill press can be a much better choice than trying to perform precision drilling by hand.
Understanding the Parts of a Drill
Before using a drill, become familiar with its controls.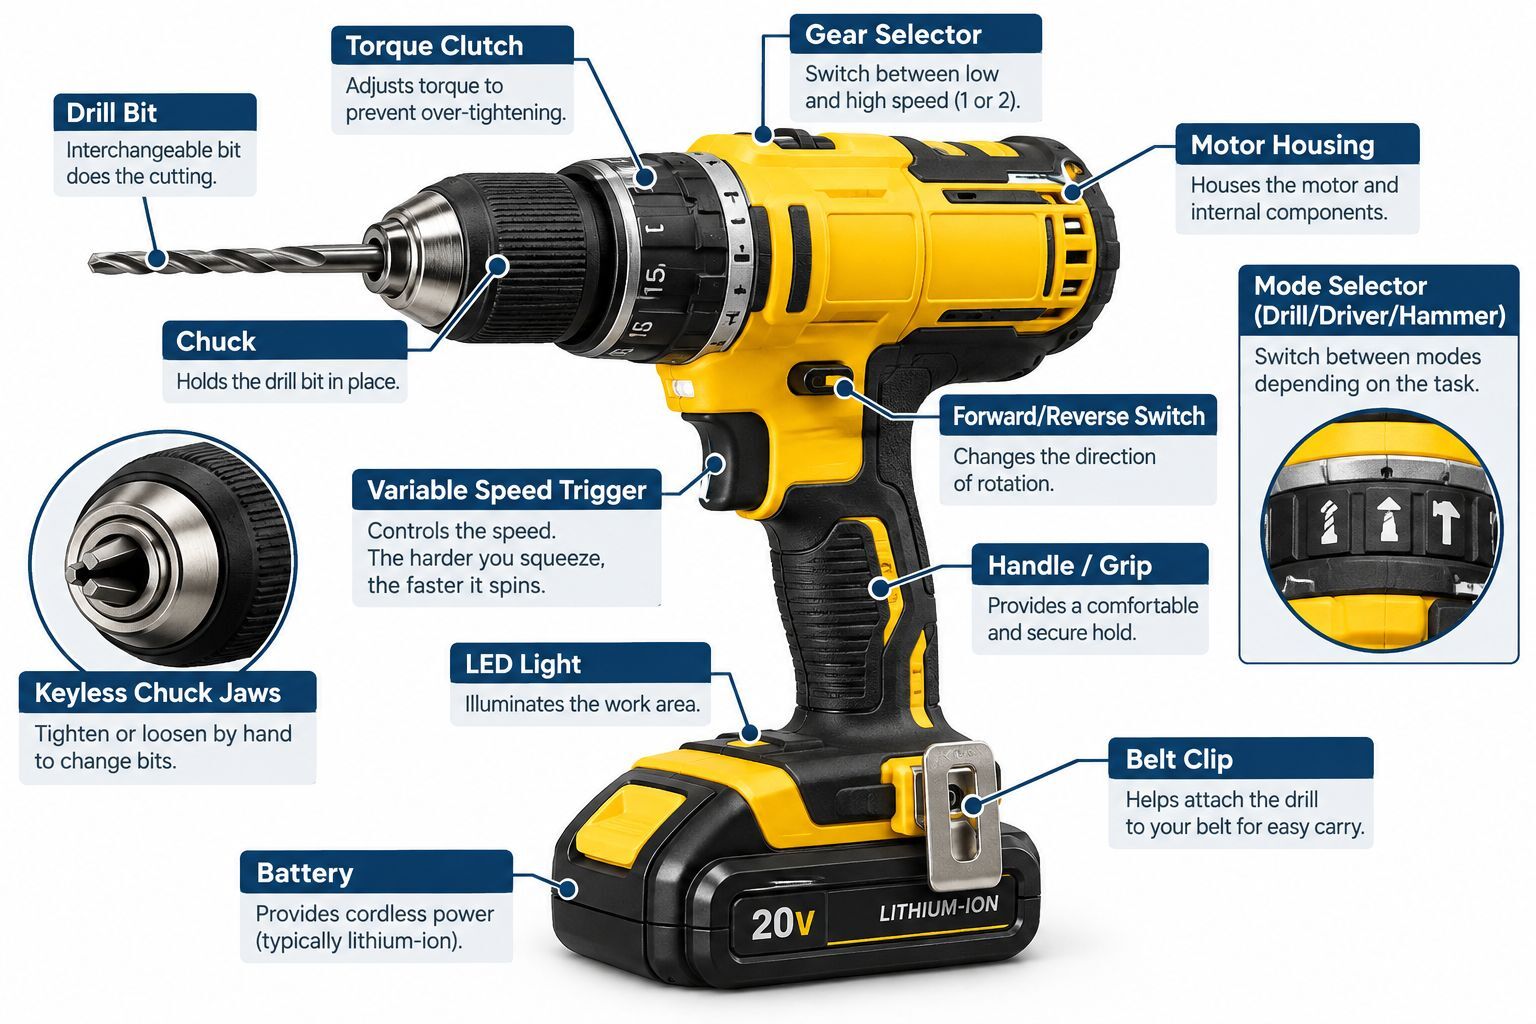
Chuck
The chuck holds the drill bit or accessory.
Common types include:
- Keyless chuck
- Keyed chuck
- Quick-change chuck
- Hex or quick-release systems on certain tools
The bit must be held securely and centered properly. A poorly installed bit can wobble, produce an oversized hole, or become dislodged during operation.
Trigger
The trigger controls the rotation speed on variable-speed drills. A light pull produces slower rotation, while pulling the trigger farther increases speed.
This is particularly useful when starting a hole because lower speed gives you greater control.
Forward/Reverse Switch
The forward setting is normally used for drilling and driving screws. Reverse is used primarily for removing screws and backing a bit out of a hole when necessary.
Never change direction while the drill is still rotating.
Clutch
Many cordless drill/drivers have an adjustable clutch. The clutch limits the amount of torque applied when driving screws.
Lower settings are useful for smaller screws and softer materials. Higher settings provide more torque when required.
The objective is not to use the highest setting. It is to use just enough torque to complete the job without damaging the fastener or workpiece.
Gear Selector
Some drills have two or more mechanical speed ranges. Lower gears generally provide more torque and are useful for larger bits or demanding drilling operations.
Higher gears provide greater rotational speed and are commonly used for smaller bits and suitable materials.
Choosing the Right Drill Bit
The drill itself is only part of the equation. The bit is the component actually doing the cutting, so choosing the correct one is critical.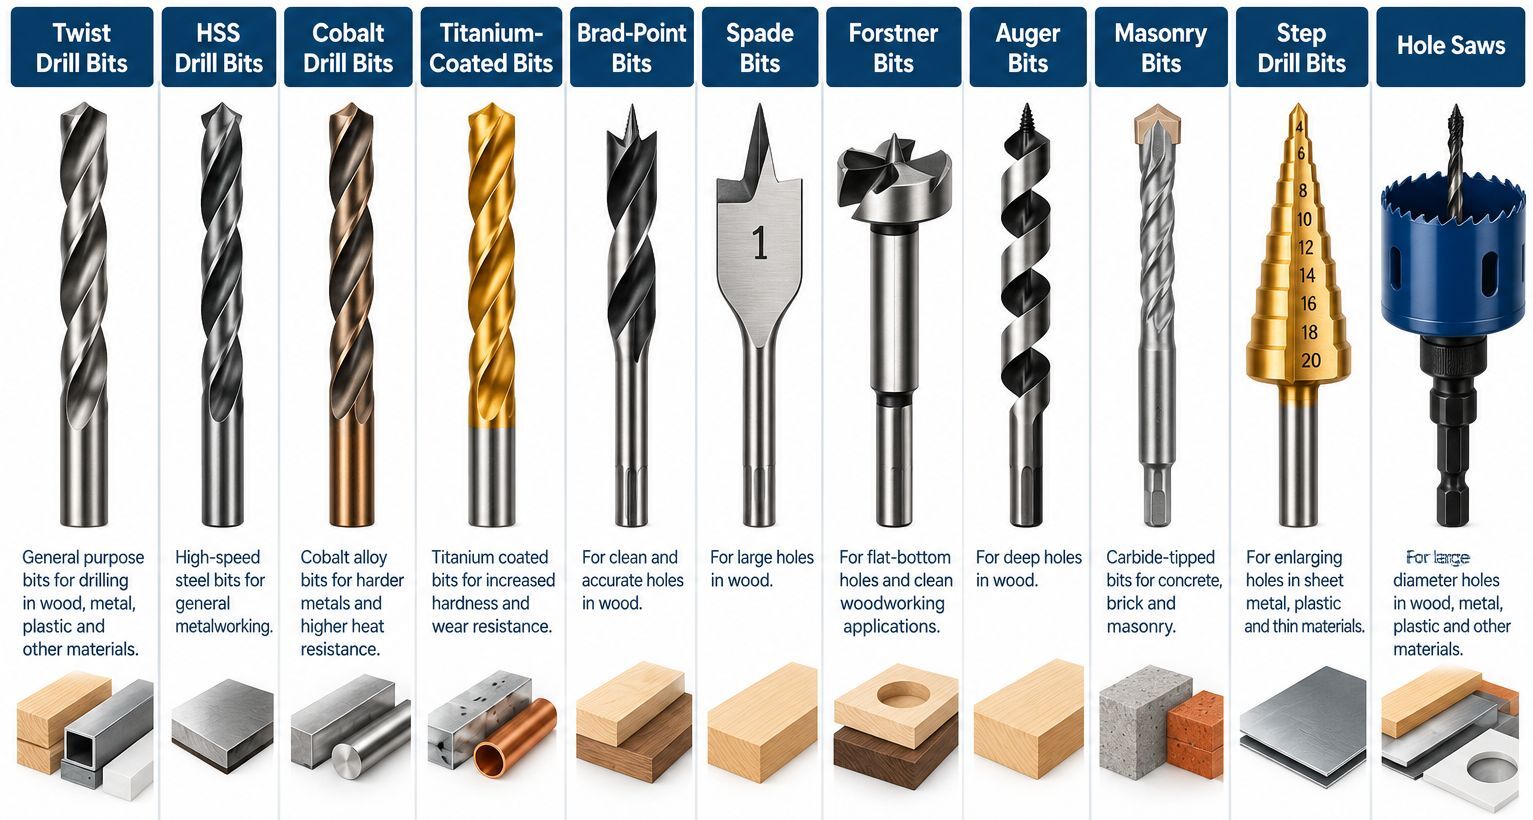
Twist Drill Bits
Twist drills are the general-purpose workhorses of drilling. Depending on their material, geometry, and coating, they can be used for applications involving steel, stainless steel, aluminum, brass, wood, plastic, and other materials.
HSS Drill Bits
High-speed steel (HSS) drill bits are designed to withstand higher temperatures than conventional carbon-steel bits and are commonly used for metalworking.
Cobalt Drill Bits
Cobalt-alloy HSS bits are useful when drilling harder metals or when greater heat resistance is required.
Titanium-Coated Bits
Titanium nitride (TiN) coated bits can provide increased surface hardness and wear resistance compared with an uncoated bit.
The coating does not automatically make a drill bit suitable for every material. The underlying bit material, geometry, speed, feed, and application still matter.
Spade Bits
Spade bits are commonly used to create larger holes in wood quickly. They are particularly useful for applications such as running cables or pipes through timber.
Forstner Bits
Forstner bits are useful when you need flat-bottom holes, clean holes, overlapping holes, or precise woodworking applications.
Auger Bits
Auger bits are designed for efficient drilling through wood and are particularly useful for deeper holes.
Hole Saws
Hole saws are used when a relatively large circular opening is required. They are commonly used for plumbing, electrical work, cabinet installation, and pipe or cable penetrations.
How to Choose the Correct Drill Bit for the Material
| Material | Common Bit Choice | Important Consideration |
|---|---|---|
| Softwood | Twist, brad-point, spade, auger | Clean chip removal |
| Hardwood | Brad-point, twist, Forstner | Control speed and pressure |
| Mild Steel | HSS twist drill | Correct RPM and lubrication |
| Stainless Steel | Cobalt/HSS | Heat control is important |
| Aluminum | HSS | Avoid excessive heat and chip buildup |
| Concrete | Carbide masonry bit / masonry tool | Hammer action may be required |
| Brick | Carbide masonry bit | Use appropriate drilling mode |
| Plastic | Appropriate twist/plastic bit | Avoid excessive heat |
Always check the bit manufacturer's recommendations before drilling unfamiliar materials.
Drill Speed Matters More Than You Think
One of the most common beginner mistakes is assuming that faster drilling is always better.
It isn't.
Drill speed should generally be selected based on:
- Bit diameter
- Material
- Bit material
- Hole depth
- Machine capability
- Cutting conditions
As bit diameter increases, the cutting speed at the outer edge of the bit increases at the same RPM. This is one reason larger bits are generally run at lower RPM.
- Larger bit = generally lower speed
- Smaller bit = generally higher speed
- Harder material = generally lower speed
- Softer material = generally higher speed
Always prioritize the manufacturer's recommended cutting parameters when they are available.
Understanding Feed Pressure
Speed isn't the only variable. You also need to control how much pressure you apply to the drill.
Too little pressure can cause the bit to rub instead of cut. This creates friction and heat.
Too much pressure can:
- Stall the drill
- Break the bit
- Deflect the bit
- Damage the workpiece
- Increase kickback risk
The objective is to apply steady, controlled pressure that allows the cutting edges to remove material efficiently.
How to Use a Drill Safely
Before drilling, take a few seconds to inspect both the tool and the work area.
Wear Eye Protection
Drilling can produce chips, dust, and other flying particles. Appropriate eye protection should be used for the application.
Inspect the Drill
Check for:
- Damaged cords
- Damaged batteries
- Loose components
- Damaged chucks
- Cracked housings
- Damaged switches
- Excessive vibration
Do not use a damaged tool.
Inspect the Bit
Look for:
- Cracks
- Excessive wear
- Damaged cutting edges
- Bent shanks
- Overheating or discoloration
Secure the Workpiece
Do not hold a loose piece of material in your hand while drilling if it can be clamped or supported.
A vise, clamp, fixture, or other suitable workholding method can prevent the material from moving unexpectedly.
Watch for Kickback
Large bits, hole saws, and bits that suddenly bind can generate substantial torque. A stalled drill can twist unexpectedly and injure the operator.
Keep a firm grip, position yourself so you can control the tool, and avoid forcing the bit.
How to Change a Drill Bit
Changing a bit is simple, but the drill should be switched off first.
Step 1: Open the Chuck
Rotate the chuck to open the jaws.
Step 2: Remove the Existing Bit
Pull the bit straight out once the jaws have released it. Be careful because recently used bits can be extremely hot.
Step 3: Insert the New Bit
Insert the shank into the chuck. Avoid inserting it so deeply that the chuck grips the flutes of the bit.
Step 4: Tighten the Chuck
Tighten the chuck securely. For keyed chucks, use the appropriate chuck key.
Step 5: Check Alignment
Run the drill briefly at low speed and watch the bit. If it wobbles, stop immediately and reinstall it.
How to Drill a Hole in Wood
Step 1: Mark the Hole
Measure carefully and mark the drilling location. A small indentation can help keep the bit from wandering when starting the hole.
Step 2: Select the Bit
Choose a bit based on the hole size and desired finish:
- Twist bit for general holes
- Brad-point bit for cleaner woodworking holes
- Spade bit for larger holes
- Forstner bit for flat-bottom holes
- Auger bit for deeper holes
- Hole saw for large openings
Step 3: Secure the Workpiece
Clamp the material whenever practical.
If the bit will pass through the wood, place a scrap block behind the workpiece. This can reduce splintering and protect the surface underneath.
Step 4: Start Slowly
Position the bit perpendicular to the workpiece. Start the drill at a controlled speed.
Step 5: Clear the Chips
When drilling deeper holes, periodically withdraw the bit to clear chips from the flutes. This helps prevent excessive heat and improves cutting performance.
Step 6: Reduce Pressure Before Breakthrough
As the bit approaches the opposite side of the workpiece, reduce pressure. Breaking through too aggressively can cause splintering or tear-out.
How to Drill Through Metal
Metal drilling requires more attention to speed, heat, and lubrication.
1. Secure the Metal
Clamp the workpiece securely in a vise or with appropriate clamps. Never try to hold a small piece of metal by hand while drilling.
2. Mark the Location
Use a center punch to create a small starting indentation. This helps prevent the bit from wandering.
3. Select the Correct Bit
For general steel, an HSS drill bit is commonly appropriate. For tougher materials or demanding applications, cobalt HSS or other specialized drill bits may be more appropriate.
4. Start at a Controlled Speed
Begin slowly and increase speed as appropriate. Watch the chips and the temperature of the workpiece and bit.
5. Use Cutting Fluid When Appropriate
Cutting fluid can help control heat and improve drilling performance in many metals. Lubricant requirements depend on the material and operation.
6. Drill a Pilot Hole for Larger Holes
Trying to take a large-diameter drill directly into steel can put substantial load on the tool. A smaller pilot hole can make the final drilling operation easier.
7. Watch the Chips
The chips produced during drilling can tell you a lot. Consistent chip formation generally indicates that the bit is cutting effectively.
If the bit is producing excessive heat, smoke, poor chip formation, or discoloration, stop and reassess the speed, feed, bit condition, and lubrication.
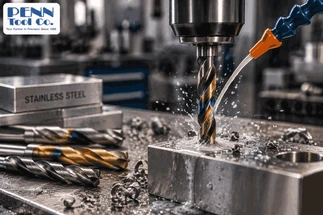
How to Drill Stainless Steel
Stainless steel deserves special attention because it can generate significant heat and may work-harden if drilled incorrectly.
Use a sharp, appropriate drill bit and avoid allowing the bit to rub against the material without cutting.
A cobalt HSS bit can be useful for demanding stainless-steel applications because cobalt alloying increases heat and wear resistance.
Use an appropriate cutting fluid and controlled speed.
How to Drill Aluminum
Aluminum is relatively soft, but that does not mean it is always easy to drill.
Its tendency to produce long chips and adhere to cutting edges can create problems.
Use:
- A sharp drill bit
- Appropriate speed
- Controlled feed pressure
- Suitable cutting fluid when recommended
Clear chips regularly, particularly during deeper holes. Avoid allowing aluminum chips to pack tightly into the flutes.
How to Drill Concrete and Masonry
Concrete, brick, and masonry require a different approach.
A conventional twist drill is generally not the correct tool for concrete.
Depending on the application, use:
- Masonry bits
- Carbide-tipped bits
- Hammer drills
- Rotary hammers
For masonry drilling, use bits specifically designed for the application and follow the tool manufacturer's instructions.
Dust control is also important when drilling masonry and concrete.
How to Drive Screws With a Drill
Step 1: Select the Correct Driver Bit
The driver bit should fit the screw head properly. A poor fit can strip the screw.
Step 2: Select the Correct Direction
Set the drill to forward.
Step 3: Set the Clutch
Start with a relatively low torque setting.
Step 4: Start Slowly
Place the bit firmly into the screw head. Pull the trigger gently and begin driving.
Step 5: Keep the Drill Straight
Try to keep the drill aligned with the screw. An angled driver can damage the screw head.
Step 6: Stop at the Correct Depth
Stop when the screw reaches the desired depth. For applications where appearance and consistency matter, the clutch can help prevent overdriving.
When Should You Drill a Pilot Hole?
Pilot holes are useful for more than just making drilling easier.
A pilot hole can:
- Help guide a larger drill bit
- Reduce wandering
- Reduce splitting in wood
- Make screw installation easier
- Reduce the amount of material removed by a large drill
- Help improve hole accuracy
For woodworking, pilot-hole diameter should be selected according to the screw, wood species, and desired holding characteristics rather than using one universal size.
What to Do if the Drill Bit Gets Stuck
A stuck bit is more than an inconvenience—it can create a sudden torque reaction.
- Release the trigger immediately.
- Keep the tool under control.
- Do not repeatedly pull the trigger while the bit is jammed.
- Identify why the bit stopped.
- Remove the bit only after the tool is safely stopped.
- Check the bit and workpiece before continuing.
If you're working with large hole saws or large-diameter bits, consider a drill equipped with appropriate torque-control or kickback protection.
Common Drill Problems and What They Mean
The Drill Bit Keeps Wandering
Possible causes:
- Starting at too high a speed
- No center punch or starting indentation
- Incorrect bit geometry
- Excessive pressure
- Poor workpiece setup
Solution: Start slowly and use a center punch or suitable pilot hole.
The Bit Gets Extremely Hot
Possible causes:
- Excessive speed
- Insufficient lubrication
- Dull bit
- Excessive pressure
- Incorrect bit for the material
Solution: Stop drilling and reassess the cutting conditions.
The Hole Is Larger Than the Bit
Possible causes:
- Bit wobble
- Loose chuck
- Bent bit
- Excessive lateral pressure
Solution: Check the bit, chuck, and drill alignment.
The Screw Keeps Stripping
Possible causes:
- Incorrect driver bit
- Poor bit engagement
- Excessive speed
- Excessive torque
- Damaged screw head
Solution: Use the correct driver bit and lower the speed or torque.
The Wood Splinters
Possible causes:
- Excessive pressure during breakthrough
- No backup material
- Incorrect bit
- Dull bit
Solution: Reduce pressure near breakthrough and use a backup block.
How to Make Your Drill Bits Last Longer
Drill bits are consumables, but proper technique can significantly improve their useful life.
Use the Correct Speed
Running a bit too fast can generate excessive heat.
Use Appropriate Lubrication
For many metal-drilling applications, cutting fluid helps control heat and friction.
Keep Bits Sharp
A dull bit requires more force and generates more heat. Replace or sharpen bits as appropriate for the application.
Do Not Force the Tool
If the drill is not cutting, pushing harder is not necessarily the answer.
Check:
- Bit selection
- Speed
- Feed
- Lubrication
- Bit condition
- Material hardness
Store Bits Properly
Keep drill bits organized and protected from unnecessary impact or contamination. A proper drill-bit case or indexed storage system can also make it easier to find the correct size quickly.
10 Drill Tips Every Beginner Should Know
- Use the right bit. A drill bit designed for wood isn't automatically suitable for steel or masonry.
- Secure the workpiece. Use clamps or a vise whenever practical.
- Start slowly. Especially when creating the initial hole.
- Match speed to the application. Bit diameter and material both matter.
- Don't force the bit. Controlled pressure is better than brute force.
- Keep the drill straight. This improves hole accuracy and reduces bit stress.
- Control heat. Use appropriate speed, lubrication, and chip clearing.
- Use a pilot hole when appropriate. Especially for large holes or certain fastening applications.
- Watch for binding. Large bits and hole saws can generate significant torque.
- Wear appropriate eye protection. A small chip can cause a serious injury.
Frequently Asked Questions About Using a Drill
Q. Can I use the same drill bit for wood and metal?
A. Some general-purpose twist bits can drill both wood and metal, but that doesn't mean they are the best choice for every application.
Specialized wood bits can provide cleaner and faster holes in wood, while HSS, cobalt, and other specialized bits may be more appropriate for metal.
Q. What speed should I use when drilling metal?
A. There isn't one RPM that works for every metal. The appropriate speed depends on the bit diameter, material, bit type, and drilling conditions.
As a general principle, larger bits and harder materials generally require slower speeds. Always use manufacturer-recommended cutting parameters when available.
Q. Why does my drill bit get hot?
A. Common reasons include excessive speed, insufficient lubrication, dull cutting edges, excessive pressure, or using the wrong bit for the material.
Stop drilling if excessive heat develops and correct the underlying cause.
Q. Should I use a hammer drill for wood?
A. Generally, no. Use the drill's rotary-only mode for wood. Hammer action is intended for applications such as masonry when using an appropriate bit.
Q. Do I need a pilot hole for every screw?
A. No. The need for a pilot hole depends on the screw, material, screw diameter, wood species, and application.
Pilot holes are particularly useful for reducing splitting and improving screw placement in many woodworking applications.
Q. Why does my drill bit keep breaking?
A. A bit may break because of:
- Excessive pressure
- Incorrect speed
- Side loading
- Poor workholding
- A dull or damaged bit
- Bit binding
- Incorrect bit selection
Use the manufacturer's recommended operating conditions and keep the drill aligned with the hole.
Final Thoughts
Using a drill well isn't about simply learning which button to press.
Good drilling comes down to understanding the relationship between the tool, bit, material, speed, feed pressure, and workholding.
Choose the right bit. Secure the workpiece. Start slowly. Let the cutting edges do the work. Control heat and chips. And when something doesn't feel right, stop and figure out why.
These habits will help you produce cleaner holes, extend the life of your drill bits, and—most importantly—work more safely.
Whether you're a homeowner completing a weekend project, a DIY enthusiast, or a professional working in a machine shop or fabrication environment, having the right drilling tools and accessories can make a significant difference.
Find the Right Drilling Tools for Your Next Project
From general-purpose drill bits to specialty cutting tools and workshop equipment, choosing the right tool can make your drilling operation faster, cleaner, and more efficient.