
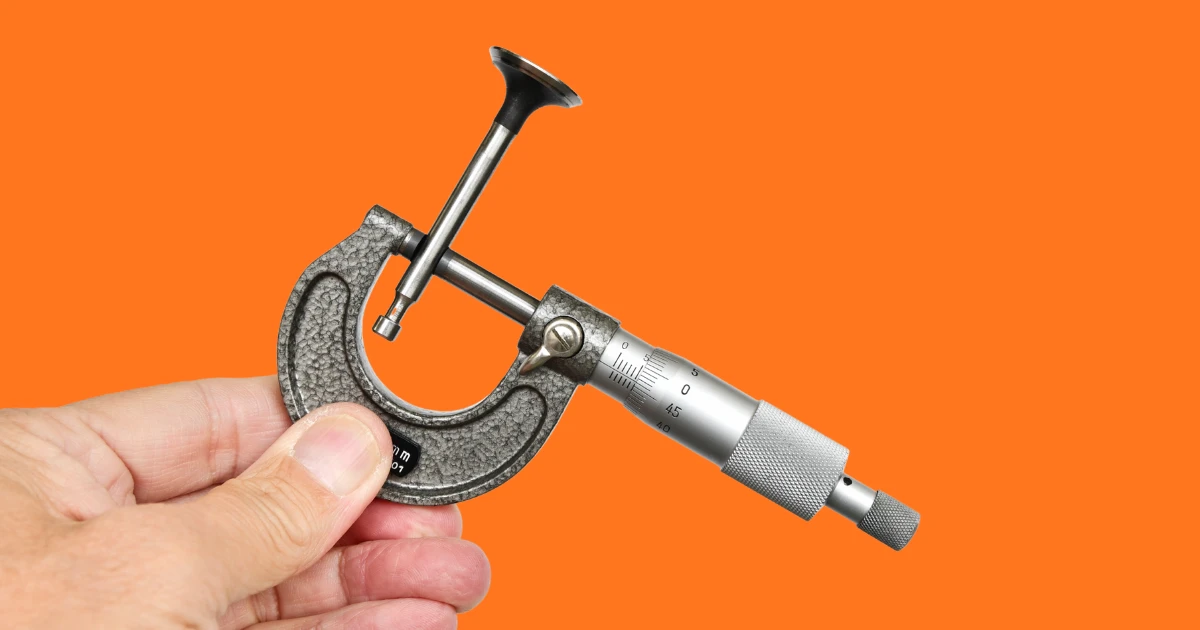
How to Read a Micrometer: A Simple Step-by-Step Guide
How to Read a Micrometer: A Simple Step-by-Step Guide

A micrometer is a precision measuring instrument used to measure small dimensions with a high degree of precision. It is commonly used in machining, manufacturing, quality control, automotive work, engineering, and metalworking.
Learning how to read a micrometer may seem complicated at first, but the process becomes straightforward once you understand the parts, the scale, and how the measurements are added together.
This guide explains how to use and read a micrometer step by step, including metric, imperial, and vernier micrometers.
What Is a Micrometer?
A micrometer is a precision measuring tool that uses a finely threaded screw mechanism to measure the size or thickness of a workpiece. The spindle moves toward or away from the anvil as the thimble is rotated.
Compared with a standard ruler or tape measure, a micrometer allows you to make much finer measurements. Depending on the model, a micrometer may measure in millimeters, inches, or smaller increments.
Common Types of Micrometers
- Outside Micrometer: Used to measure outside dimensions such as shaft diameter, material thickness, and the outside diameter of components.
- Inside Micrometer: Used to measure internal dimensions such as the diameter of holes and bores.
- Depth Micrometer: Used to measure the depth of holes, slots, recesses, and steps.
- Thread Micrometer: Designed to measure the pitch diameter of threaded components.
- Digital Micrometer: Displays the measurement electronically, making the reading easier to interpret.
Know the Parts of a Micrometer
Before learning how to read the scale, it helps to become familiar with the main parts of the instrument.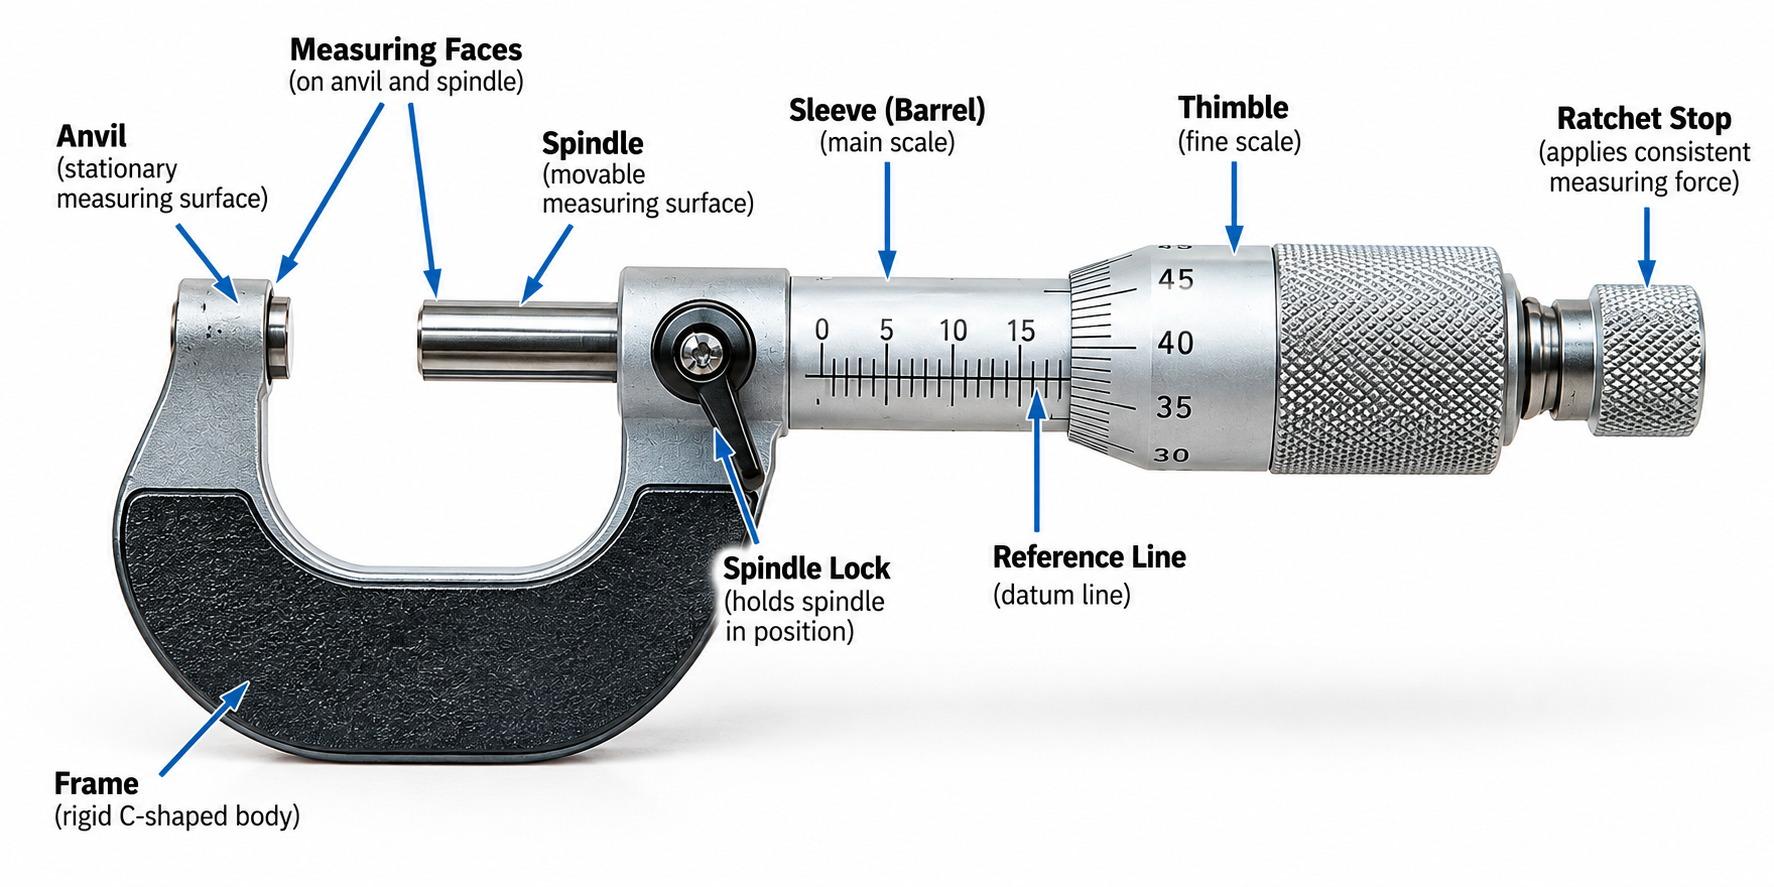
Frame
The frame is the rigid C-shaped body of the micrometer. It supports the anvil, spindle, sleeve, and other components and keeps the measuring mechanism aligned.
Anvil
The anvil is the fixed measuring surface. The workpiece is placed against the anvil while the spindle moves toward it.
Spindle
The spindle is the movable measuring component. It moves toward or away from the anvil when the thimble is rotated.
Measuring Faces
The measuring faces are the precision surfaces that make contact with the workpiece. One is located on the anvil and the other on the spindle.
Sleeve or Barrel
The sleeve, sometimes called the barrel, contains the main scale. On a typical metric micrometer, the sleeve shows millimeter and half-millimeter graduations.
Thimble
The thimble is the rotating part of the micrometer. Its graduated scale provides the additional measurement needed to obtain the final reading.
Ratchet Stop
The ratchet stop is used to apply a consistent measuring force. It helps prevent excessive tightening when the spindle contacts the workpiece.
Spindle Lock
The spindle lock holds the spindle in position after a measurement has been established. It can be useful when you need to remove the micrometer from the workpiece before recording the measurement.
What Is Least Count?
The least count is the smallest measurement that a measuring instrument can resolve on its scale. It tells you how finely the instrument is graduated.
For example, a common metric micrometer has a least count of 0.01 mm. This means the scale is divided into increments of 0.01 mm.
How to Calculate Least Count
For a conventional micrometer, the least count can be calculated using:
Least Count = Screw Pitch ÷ Number of Thimble Divisions
For example, if the spindle moves 0.5 mm during one complete revolution and the thimble has 50 divisions:
0.5 mm ÷ 50 = 0.01 mm
Least Count Is Not the Same as Accuracy
Least count and accuracy are different specifications. Least count describes the smallest graduation or resolution of the instrument, while accuracy describes how closely the measurement agrees with the actual dimension.
Therefore, a micrometer with a 0.01 mm least count should not automatically be described as being accurate to exactly 0.01 mm. Always check the manufacturer's specifications for the instrument's accuracy and tolerance.
How to Prepare a Micrometer for Measurement
Proper preparation is important because dirt, chips, oil, or incorrect zero adjustment can affect the measurement.
1. Clean the Measuring Faces
Wipe the anvil and spindle measuring faces with a clean, soft cloth. Remove any chips, dirt, oil, or other material that could create a gap between the measuring faces and the workpiece.
2. Clean the Workpiece
Make sure the surface being measured is clean. Even a small chip or particle between the workpiece and measuring faces can produce an incorrect reading.
3. Check the Zero
Before taking a measurement, close the measuring faces carefully and check the zero position.
When the measuring faces are properly closed, the zero mark should align with the reference line. If the zero does not align, the instrument may have zero error and should be adjusted or its zero error should be accounted for according to the manufacturer's instructions.
How to Take a Measurement With a Micrometer
Once the micrometer and workpiece are clean, follow these steps.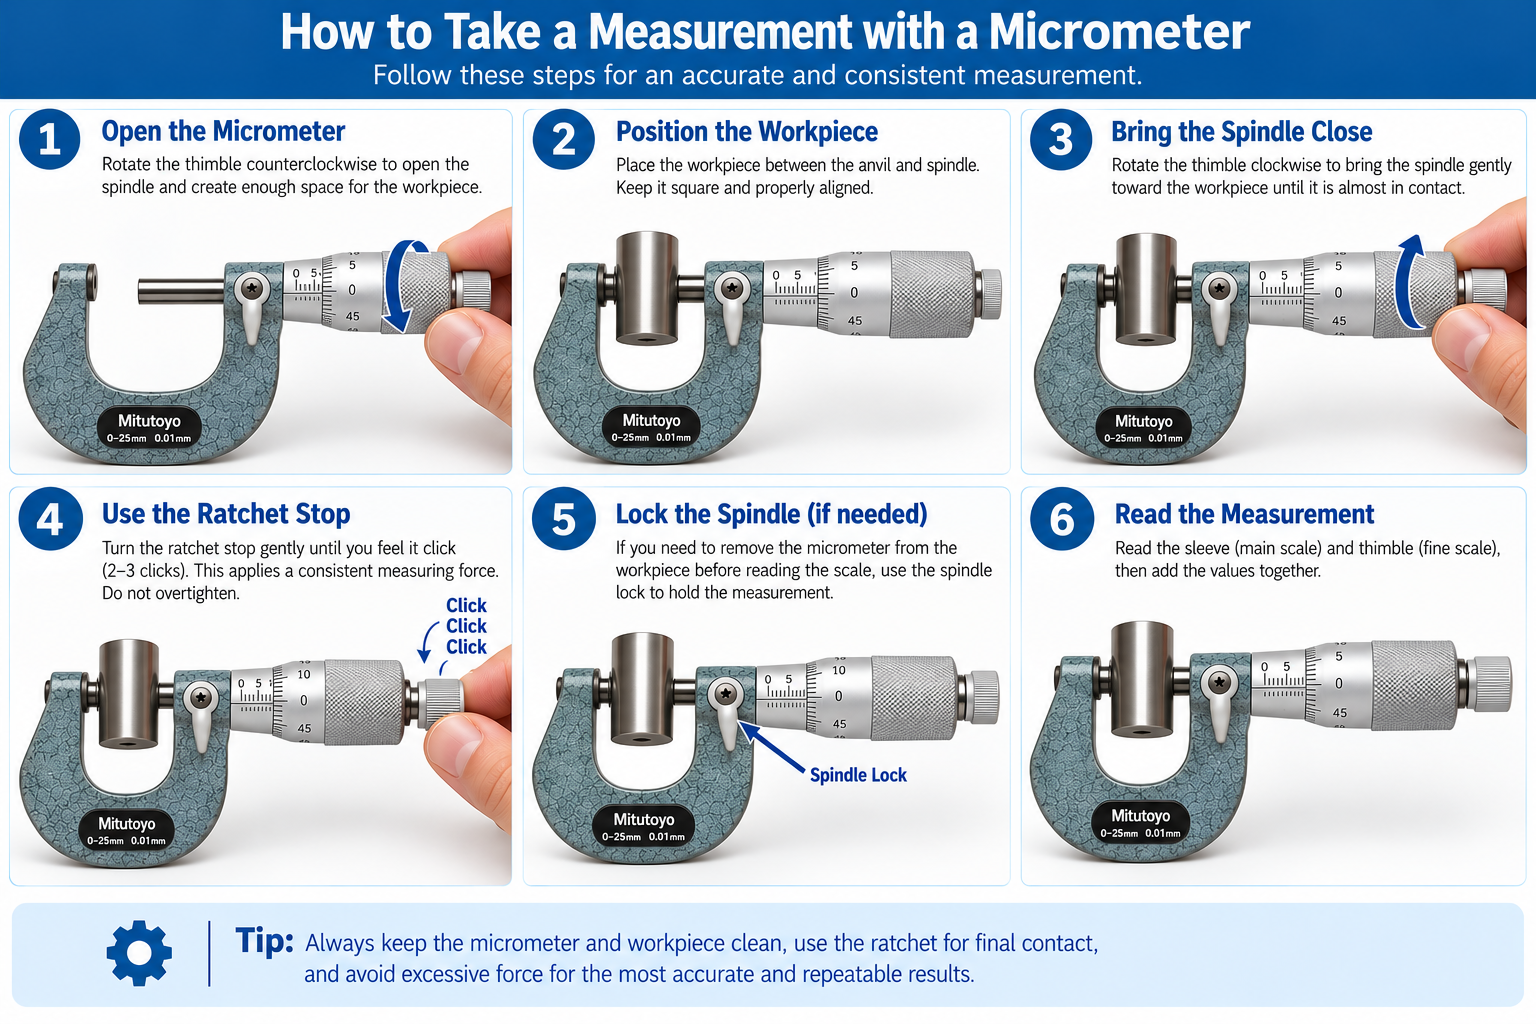
1. Open the Micrometer
Rotate the thimble to create enough space between the anvil and spindle for the workpiece.
2. Position the Workpiece
Place the part between the anvil and spindle. Make sure the area being measured is positioned correctly between the measuring faces.
3. Align the Micrometer Correctly
Proper alignment is essential. For example, when measuring the diameter of a round shaft, keep the micrometer square to the shaft rather than holding it at an angle.
Incorrect alignment can cause the measuring faces to contact the workpiece incorrectly and produce a misleading measurement.
4. Bring the Spindle Close to the Workpiece
Rotate the thimble until the spindle approaches the workpiece. Do not force the spindle against the part.
5. Use the Ratchet Stop for the Final Measurement
Once the spindle is close to the workpiece, use the ratchet stop to make the final contact. Turn it gently until the ratchet operates as designed.
The ratchet helps provide a more consistent measuring force. Avoid using excessive force because overtightening can affect the measurement and potentially damage the instrument or workpiece.
6. Lock the Spindle if Necessary
If you need to remove the micrometer from the workpiece while keeping the established measurement, use the spindle lock.
How to Read a Metric Micrometer
Reading a metric micrometer involves combining the main scale reading from the sleeve with the thimble reading.
The basic formula is:
Final Reading = Main Scale Reading + Thimble Reading
The thimble reading is calculated by multiplying the number of visible thimble divisions by the least count.
Thimble Reading = Thimble Division × Least Count
Step 1: Read the Main Scale
Look at the sleeve and identify the last fully visible millimeter mark before the edge of the thimble.
Step 2: Check the Half-Millimeter Mark
Check whether the 0.5 mm graduation is also visible. If it is visible, add 0.50 mm to the main scale reading.
Step 3: Read the Thimble Scale
Look at the thimble graduation that aligns with the reference line on the sleeve. Multiply that division by the micrometer's least count.
Step 4: Add the Readings
Suppose the micrometer shows:
- Main scale reading = 6.00 mm
- Half-millimeter mark = 0.50 mm
- Thimble reading = 43 divisions
- Least count = 0.01 mm
First calculate the thimble reading:
43 × 0.01 mm = 0.43 mm
Now add all the values:
6.00 + 0.50 + 0.43 = 6.93 mm
Therefore, the final measurement is 6.93 mm.
How to Read an Imperial Micrometer
Imperial micrometers are read using inches rather than millimeters. The same basic principle applies: read the sleeve and then add the thimble reading.
A common imperial micrometer has a least count of 0.001 inch, although the exact specification depends on the instrument.
Example
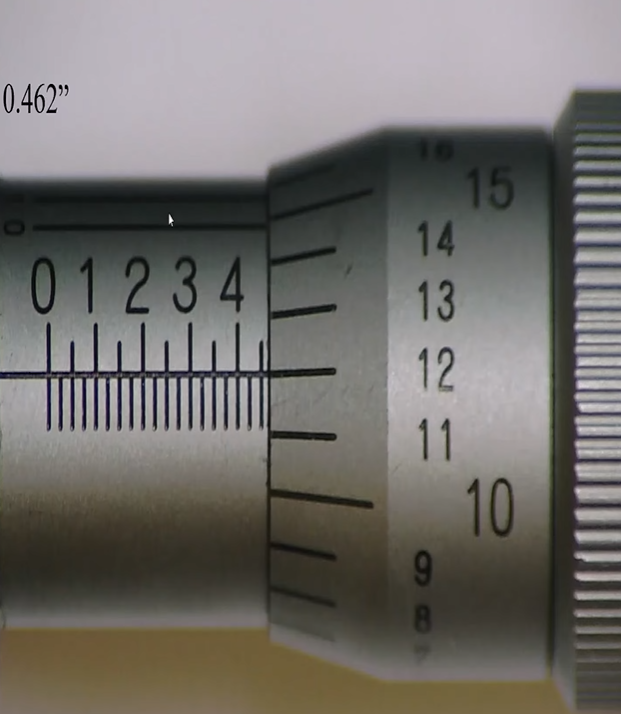
Suppose the sleeve reading is 0.45 inch and the thimble indicates 12 divisions on a 0.001-inch micrometer.
0.45 + (12 × 0.001) = 0.462 inch
The final measurement is 0.462 inch.
Common Mistakes When Using a Micrometer
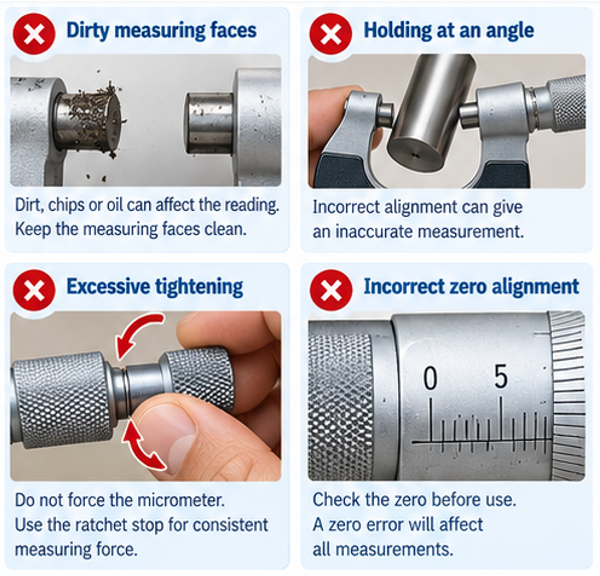
Dirty Measuring Faces
Dirt, chips, dust, or oil between the measuring faces and workpiece can change the measurement. Always clean the contact surfaces before measuring.
Holding the Micrometer at an Angle
Incorrect alignment can produce an incorrect measurement, particularly when measuring round components.
Overtightening
Do not force the spindle against the workpiece. Use the ratchet stop for the final contact and apply consistent, appropriate measuring force.
Ignoring Zero Error
Always check the zero before taking measurements. If the zero is incorrect, the resulting readings may also be incorrect.
Reading the Wrong Thimble Graduation
Make sure you read the graduation that aligns with the reference line rather than simply selecting the nearest visible number.
Tips for More Accurate Micrometer Measurements
- Clean the micrometer before use.
- Clean the workpiece before measuring.
- Check the zero position before taking measurements.
- Keep the micrometer properly aligned with the workpiece.
- Use the ratchet stop for the final measuring force.
- Do not overtighten the spindle.
- Take multiple measurements when checking critical dimensions.
- Allow the instrument and workpiece to reach a suitable temperature when making high-precision measurements.
- Keep the micrometer clean and protected when it is not being used.
Micrometer vs. Caliper: What's the Difference?
Both micrometers and calipers are useful precision measuring tools, but they are suited to different applications.
| Feature | Micrometer | Caliper |
|---|---|---|
| Typical use | Precision measurement | General-purpose measurement |
| Measurement range | Usually more limited | Generally wider |
| Precision | Typically higher | Typically lower than a micrometer for fine measurements |
| Best for | Fine dimensional checks | Quick inside, outside, depth, and step measurements |
Micrometer Reading: Quick Reference
Before Measuring
- Clean the measuring faces.
- Clean the workpiece.
- Check the zero.
While Measuring
- Open the micrometer.
- Position the workpiece correctly.
- Align the micrometer properly.
- Bring the spindle close.
- Use the ratchet for final contact.
- Avoid overtightening.
To Read a Metric Micrometer
Main Scale + Half-Millimeter Mark + (Thimble Division × Least Count) = Final Measurement
Frequently Asked Questions
What is the least count of a micrometer?
A common mechanical metric micrometer has a least count of 0.01 mm, while a common imperial micrometer may have a least count of 0.001 inch. However, specifications vary, so check the particular instrument.
What is the difference between least count and accuracy?
Least count is the smallest scale increment that the instrument can resolve. Accuracy refers to how closely the measurement represents the actual dimension. They are not the same specification.
Why is the ratchet stop used?
The ratchet stop helps apply a more consistent measuring force during the final part of the measurement and helps prevent excessive tightening.
Why should I check the zero before measuring?
A zero error can affect every measurement taken with the instrument. Checking the zero helps identify this problem before measurements are recorded.
Can a micrometer measure inside dimensions?
Yes. Inside micrometers are specifically designed for measuring internal dimensions such as holes and bores. Different micrometer designs are available for different measurement applications.
Which is more accurate, a micrometer or a caliper?
A micrometer is generally preferred when a finer dimensional measurement is required. Calipers are more versatile and typically provide a wider range of measurement functions.
Final Takeaway
Reading a micrometer becomes much easier once you understand what each part does and how the scales work together.
For a metric micrometer, start with the main scale, check the half-millimeter graduation, read the thimble, multiply the thimble division by the least count, and add the values together.
Most importantly, accurate readings depend on more than simply reading the scale. Keep the measuring faces and workpiece clean, check the zero, maintain proper alignment, and use the ratchet stop rather than excessive force.
With the right technique, a micrometer can provide highly precise dimensional measurements for machining, manufacturing, inspection, and other precision applications.